

")
Getting a document that needs your signature doesn’t have to mean digging out a printer or messing with a scanner. In 2025, most of us are working digitally, and signing documents should be just as simple. If you’re using Microsoft Word on a Windows PC or a Mac, you can add your signature directly to the file in just a few steps. It’s quick, convenient, and completely paper-free. In this guide, we’ll walk you through the easiest ways to sign Word documents using the built-in tools available on both platforms.
What Does “Signing” a Word Document Mean?
A signature on a Word document can mean a few different things, depending on the context. It can be:
- A Visual Signature: An image or handwritten scribble added to the document to signify agreement or authorship. This is the most common form for everyday use.
- A Digital Signature: A more secure, encrypted signature that verifies the identity of the signer and ensures the document hasn’t been tampered with after being signed. This is often used for legal and security-sensitive documents.
- A Signature Line: A placeholder where another person can add their digital signature.
This guide focuses on the first two, providing simple steps to get the job done.
Insert a Signature in a Word Document in Windows
The easiest way to add a signature is to use the built-in functionality within Microsoft Word. You can insert a signature as a picture file, or use a “signature line” which provides a more official, digital-based option. For a quick, reusable option, this method is ideal.
How to Create and Insert a Handwritten Signature in a Word Document (Windows)
For a personalized touch, you can create and reuse a picture of your handwritten signature. This works best if you have a tablet with a stylus, or if you can sign on a piece of paper and scan it.
Step 1 – Sign and Scan
Sign your name clearly on a clean, white piece of paper. Use a dark pen. Take a high-quality photo of your signature or scan it.
Step 2 – Crop and Save
")
Open the image in an editing tool like Paint or Photoshop. Crop the image so only the signature is visible, and save it as a .PNG file with a transparent background. This makes it easier to place on any document.
Step 3 – Insert into Word
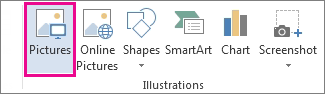
Open your Word document and place your cursor where you want the signature to appear. Go to the Insert tab, click on Pictures, and then select This Device. Navigate to your saved signature file and click Insert.
Step 4 – Format the Image
Click on the inserted signature image. Use the formatting tools to resize and position it correctly. Change the text wrapping to “In Front of Text” for easy movement.
How to Include Typewritten Text with Your Reusable Signature (Windows)
To save time, you can create a reusable signature block that includes your handwritten signature image, your typed name, and your title.
Step 1 – Create the Block
Type your name and title below your signature image. Highlight both the image and the text.
Step 2 – Save as a Quick Part
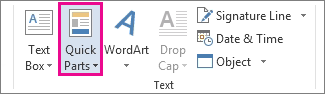
Go to the Insert tab, click on Quick Parts, then select AutoText and Save Selection to AutoText Gallery.
Step 3 – Name It
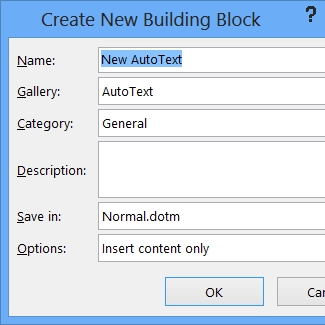
Give your signature block a memorable name, such as “My Signature Block.”
Step 4 – Reuse
The next time you need to sign a document, simply go to the Quick Parts menu and select your saved signature block.
Insert a Signature Line in a Word Document (Windows)
For a more formal and verifiable signature, a signature line is the way to go. It adds a placeholder that can be digitally signed by someone.
Step 1 – Add a Signature Line
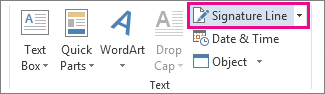
In your Word document, go to the Insert tab and click on the Signature Line button in the Text group. Select “Microsoft Office Signature Line.”
Step 2 – Fill in Details
A dialog box will appear. Enter the suggested signer’s name, their title, and their email address. You can also add instructions for the signer.
Step 3 -The Signature Line Appears
A signature line will be added to your document, ready for a digital signature. To sign, the recipient simply double-clicks the line and follows the prompts.
Insert a Signature in a Word Document in macOS
Just like with Windows, Word for Mac offers simple and effective ways to add signatures. The process is streamlined and mirrors the Windows version for a consistent user experience. This includes inserting a picture of your signature and creating a reusable signature block.
How to Scan and Insert a Picture of Your Handwritten Signature (macOS)
For Mac users, this process is seamless with the built-in capabilities of Preview and the camera on your device.
Step 1 – Create the Image
Sign your name on a white piece of paper.
Step 2 – Use Continuity Camera
In Word, place your cursor where you want the signature. Go to Insert > Pictures > Scan a Document (or use the similar option in the menu). Your Mac will prompt you to use your iPhone or iPad.
Step 3 – Scan and Insert
Use your iPhone’s camera to scan the signature. It will be automatically cropped and inserted into your Word document.
Step 4 – Manual Method
Alternatively, take a picture with your phone and use Preview to open it. Select the signature, use the Instant Alpha tool to make the background transparent, and then copy and paste the image into Word.
How to Include Text with Your Reusable Signature (macOS)
Saving your signature with accompanying text is a great time-saver.
Step 1 – Create the Block
After inserting your signature image, add your name, title, and any other relevant information below it.
Step 2 – Save as AutoText
Select the entire signature block (image and text). Go to Insert > AutoText > New. Give it a descriptive name and click OK.
Step 3 – Reuse
Your saved signature block is now available in the AutoText gallery for quick insertion in any future document.
How to Sign a Word Document with Third-Party Software Tools
For legally binding eSignatures, or for a more advanced workflow, third-party software tools are the best option. Platforms like DocuSign, Adobe Sign, and Signeasy offer robust features, including:
- Legal Validity: eSignatures created with these tools are often legally binding.
- Audit Trails: They provide detailed records of who signed, when, and from where.
- Security: Documents are encrypted and protected from tampering.
- Workflow Automation: Easily send documents to multiple parties for signing.
While these services require a subscription, they are indispensable for businesses that handle a high volume of contracts or legal agreements.
Other Tools for Signing Word Documents
- PDF Converters: A common workflow is to convert the Word document to a PDF, then use a tool like Adobe Acrobat Reader or Preview (on Mac) to add a visual signature. This is a good option if you need to lock the content and prevent further editing.
- Cloud Services: If you use cloud storage like Dropbox or Google Drive, they often have built-in signature tools or integrations with eSignature platforms.
FAQs
Can I sign a Word doc on mobile?
Yes. The Microsoft Word app for both iOS and Android allows you to insert a picture of your signature. You can also use a third-party eSignature app like Adobe Sign or DocuSign, which have dedicated mobile apps for signing documents on the go.
How do I remove a signature from a Word document?
To remove a visual signature (a picture), simply click on the image and press the Delete or Backspace key. If it’s a digital signature, you can right-click the signature line and select “Remove Signature.”
What’s the difference between a visual and a digital signature?
A visual signature is a simple image. While it shows your intent to sign, it’s not legally binding in most cases and can be easily copied. A digital signature is a secure, encrypted type of signature that uses a certificate to verify the signer’s identity and ensures the document’s integrity. It is legally valid and tamper-proof.
Can I create a digital signature for free?
You can create a basic digital signature in Word using a signature line, but for a truly secure, certificate-based signature, you’ll need to obtain a digital ID from a reputable Certificate Authority (CA), which usually has a cost.
The post How to Sign a Word Document in Windows and macOS (2025) appeared first on SaaSworthy Blog | Top Software, Statistics, Insights, Reviews & Trends in SaaS.
")


